In the past jailbreaking was almost a necessity to get the functionality you wanted out of your iPhone, but with a rapidly maturing operating system with most of the features people want it's not as much of a concern as it used to be. That said, you don't want to discount the jailbreaking process. The awesome things you can do may not be obvious anymore, but they're still awesome. The jailbreaking process is easier than ever and the community of developers and users is wonderfully large. The primary reason to jailbreak nowadays is that if you have a problem, in a day or two someone will have developed a solution. Take Sparrow for example. It's a phenomenal mail client for the iPhone, but because of Apple's restrictions it can't safely offer push notifications for new messages. This bothered some people, in within a day Sparrow Push was developed to provide that functionality. On top of that there are plenty of great apps and notification center tweaks that are a good place to start if you're new to jailbreaking. It may not be the necessity it once was, but it's now awesome for several new reasons.
Showing posts with label Hardware. Show all posts
Jailbreak Your iPhone
In the past jailbreaking was almost a necessity to get the functionality you wanted out of your iPhone, but with a rapidly maturing operating system with most of the features people want it's not as much of a concern as it used to be. That said, you don't want to discount the jailbreaking process. The awesome things you can do may not be obvious anymore, but they're still awesome. The jailbreaking process is easier than ever and the community of developers and users is wonderfully large. The primary reason to jailbreak nowadays is that if you have a problem, in a day or two someone will have developed a solution. Take Sparrow for example. It's a phenomenal mail client for the iPhone, but because of Apple's restrictions it can't safely offer push notifications for new messages. This bothered some people, in within a day Sparrow Push was developed to provide that functionality. On top of that there are plenty of great apps and notification center tweaks that are a good place to start if you're new to jailbreaking. It may not be the necessity it once was, but it's now awesome for several new reasons.
Boost Your Router with DD-WRT or Tomato
Out of the box, the firmware on most routers isn't great. It lacks features, doesn't work properly, or is just a pain to use. Two custom firmware upgrades are available to solve some or all of those problems: DD-WRT and Tomato. DD-WRT is geared at providing you with a level of control you'd expect from a professional-grade router. Tomato was designed to make your router much more user-friendly so you don't have to be an expert to use it. Tomato also provides a number of important features missing from some router firmware, too. However you slice it, these upgrades can make your life easier, help you boost a crappy Wi-Fi signal, configure a more functional network setup, and a whole lot more. It's not the flashiest of hardware boosting hacks, but it is one of the best. Your network will thank you for it.
Read more
Read more
How To Use Your iPhone As A Mouse and Keyboard
Apple iDevices can easily replace many different devices in your home. In one of my previous tutorials I showed you how you can replace your Apple TV remote controller with iPhone, iPad or iPod . In this tutorial I will show you how you can turn your iDevice into wireless mouse or keyboard which you can use to control your Windows or Mac computer. With simple and lightweight application from Logitech, enabling this feature on your iDevice is nothing complicated.

To get started follow steps below
Step 1: To get started you will need to download Logitech Touch Mouse Server and install it on your Windows or Mac computer.
Step 2: Once installation is finished click Start menu, locate Logitech Touch Mouse Server and start the application
Step 3: If you are using Windows 7 or older, a small icon will appear in your system tray

Step 4: Next download and install Touch Mouse on your iOS Device
Step 5: Once you have installed it on your iDevice start the application

Step 6: Now make sure that your iOS device is connected to the same WiFi network as your Windows or Mac computer, if not you will get an error message as you can see from image below

Step 7: From the list select your Windows or Mac computer that you want to control by taping on its name
Step 8: Once you have selected the computer a touchpad interface will appear with few buttons similar to your mouse. Use your fingers and move them inside touch pad black space, you will notice that your mouse cursor is moving on your computer
Step 9: If you tap on white keyboard icon located at bottom right of your iDevice screen you will activate a keypad on your iOS iDevice which will enable you to use a keyboard on your computer

Step 10: By taping on Settings icon located on bottom right corner of your iOS iDevice screen you will bring a settings menu where you can adjust Buttons Options, Scrolling Options, Tracking Options and few other options

Step 11: If you no longer wish to use your iDevice as mouse or keyboard simply tap on a second icon from bottom right and you will disconnect your phone from your computer

To get started follow steps below
Step 1: To get started you will need to download Logitech Touch Mouse Server and install it on your Windows or Mac computer.
Step 2: Once installation is finished click Start menu, locate Logitech Touch Mouse Server and start the application
Step 3: If you are using Windows 7 or older, a small icon will appear in your system tray
Step 4: Next download and install Touch Mouse on your iOS Device
Step 5: Once you have installed it on your iDevice start the application
Step 6: Now make sure that your iOS device is connected to the same WiFi network as your Windows or Mac computer, if not you will get an error message as you can see from image below
Step 7: From the list select your Windows or Mac computer that you want to control by taping on its name
Step 8: Once you have selected the computer a touchpad interface will appear with few buttons similar to your mouse. Use your fingers and move them inside touch pad black space, you will notice that your mouse cursor is moving on your computer
Step 9: If you tap on white keyboard icon located at bottom right of your iDevice screen you will activate a keypad on your iOS iDevice which will enable you to use a keyboard on your computer
Step 10: By taping on Settings icon located on bottom right corner of your iOS iDevice screen you will bring a settings menu where you can adjust Buttons Options, Scrolling Options, Tracking Options and few other options
Step 11: If you no longer wish to use your iDevice as mouse or keyboard simply tap on a second icon from bottom right and you will disconnect your phone from your computer
How To Remotely Control Apple TV from Your iPad or iPhone
If you find the physical remote that comes with Apple TV too small then you should try using your iPad or iPhone as a remote controller. In this tutorial I will show you how to using Apple Remote app on your iDevice control Apple TV. The coolest Remote app features on your iPhone or iPad is to use an iPad keyboard when you need to type, much easier than using physical remote.

Since I prefer to use it mostly on my iPad i will show you how to enable it under iPad however this procedure is almost the same on iPhone too. To get started follow steps below.
Step 1: For this purpose we will need to download Apple Remote app on our iDevice. This app is free, and once installation is finished lunch the Remote app and then tap on Turn on Home Sharing

Step 2: Now enter your Apple ID and password and then tap Done
Step 3: You should see a message telling you to configure Apple TV with Home Sharing

Step 4: Now on your Apple TV main menu go to Computers and then choose Turn on Home Sharing
Step 5: When we have successfully setup Home Sharing on our iDevice (In my case iPad) we are gone start using Remote app since all adjustments are done.
Step 6: Lunch Remote app on your iPad or iPhone and then you need to tap on big Apple TV icon

Step 7: Tap on Use gestures to control Apple TV
Step 8: Tap on Menu located at bottom of your screen to power on the Apple TV.

Step 9: Use finger gestures on your iDevice to navigate menus and control your Apple TV
You are finished now! Share your experience with us do you like this app or you prefer Apple TV physical remote.
Since I prefer to use it mostly on my iPad i will show you how to enable it under iPad however this procedure is almost the same on iPhone too. To get started follow steps below.
Step 1: For this purpose we will need to download Apple Remote app on our iDevice. This app is free, and once installation is finished lunch the Remote app and then tap on Turn on Home Sharing
Step 2: Now enter your Apple ID and password and then tap Done
Step 3: You should see a message telling you to configure Apple TV with Home Sharing
Step 4: Now on your Apple TV main menu go to Computers and then choose Turn on Home Sharing
Step 5: When we have successfully setup Home Sharing on our iDevice (In my case iPad) we are gone start using Remote app since all adjustments are done.
Step 6: Lunch Remote app on your iPad or iPhone and then you need to tap on big Apple TV icon
Step 7: Tap on Use gestures to control Apple TV
Step 8: Tap on Menu located at bottom of your screen to power on the Apple TV.
Step 9: Use finger gestures on your iDevice to navigate menus and control your Apple TV
You are finished now! Share your experience with us do you like this app or you prefer Apple TV physical remote.
Use the exFAT File System and Never Format Your External Drive Again
Using an external drive between Mac and Windows computers can be a hassle, since you constantly have to reformat it to fit which computer you're using it on. Instead of reformatting it all the time, just use the much more platform-independent exFAT and never format it again.
Windows' default NTFS is only readable on OS X, not writable, and Windows computers can't even read Mac-formatted HFS+ drives. FAT32 works for both OSes, but has a 4GB size limit per file, so it isn't ideal. You can always install drivers for those other OSes, but that doesn't help when you're sharing files with your friends' computers. Besides, it's kind of a hassle. The exFAT file system is a much simpler option.
exFAT has been around for awhile, but we've never really talked about it. Essentially, it's a file system that's both readable and writable on any modern Mac or Windows machine (sorry, Leopard users). All you need to do is format the drive on a Windows machine and you're good to go. Note that you can't format it on OS X, you have to format it on Windows for it to be compatible with both platforms (Update: A lot of you are noting that OS X formats these just fine, so your mileage may vary). To do so, just:
Source life hacker
Windows' default NTFS is only readable on OS X, not writable, and Windows computers can't even read Mac-formatted HFS+ drives. FAT32 works for both OSes, but has a 4GB size limit per file, so it isn't ideal. You can always install drivers for those other OSes, but that doesn't help when you're sharing files with your friends' computers. Besides, it's kind of a hassle. The exFAT file system is a much simpler option.
exFAT has been around for awhile, but we've never really talked about it. Essentially, it's a file system that's both readable and writable on any modern Mac or Windows machine (sorry, Leopard users). All you need to do is format the drive on a Windows machine and you're good to go. Note that you can't format it on OS X, you have to format it on Windows for it to be compatible with both platforms (Update: A lot of you are noting that OS X formats these just fine, so your mileage may vary). To do so, just:
- Open up Windows Explorer and right-click on your drive in the sidebar. Choose "Format".
- In the "File System" dropdown, choose exFAT instead of NTFS.
- Click Start and close this window when finished.
Source life hacker
How To Share Your Optical Drive In Windows 7
With netbooks and ultrabooks, laptops are becoming smaller and lighter. To achieve this miniaturization, manufacturers have chosen to remove optical drives and gives you no options to access to any DVD or CD. However if you have a desktop computer and your computers are networked you can easily share the optical drive on the desktop computer for use on your laptop through the LAN and in this tutorial I will show you how to make this possible within Windows 7.
To get started follow steps below
Step 1: First click the Start button and then choose Computer.
Step 2: Right mouse click on the drive which you want to share and from context menu choose Properties.

Step 3: Open the Sharing tab.

Step 4: In the window that opens, click Advanced Sharing.

Step 5: In window that showup check the box in front of Share this folder
Step 6: Name the player, Shared Drive for example and then click the Permissions button.

Step 7: Verify that the Everyone group has read access to the drive. Confirm changes by clicking OK twice.

Step 8: Now when we have our drive available for sharing lets simply the access to him by disabling the password request for example. For that while still in Sharing tab you opened in Step 3 click on the link Network and Sharing Center link.

Step 9: Now under Password protected sharing select Turn off password protected sharing.

Step 10: Click Save Changes and your optical drive is then shared.
Step 11: If you want to be sure that your drive is shared an icon in the explorer indicates that the drive is shared (see image below).

Step 12: Now lets access your drive from other computer or laptop on which you don’t have optical drive. For that click the Start button and click Computer.
Step 13: In the left pane, click Network.

Step 14: Double click the name of the computer on which you have shared the optical drive and he should appear in the results list.

Step 15: Right mouse click on yellow folder with your drive name you previous added and then from context menu click Map Network Drive.

Step 16: Choose the letter to assign to that drive and click Finish

Step 17: The optical drive which you just chosen to be shared will appear in the Windows Explorer of any computer in your network, under the section Network Location.
You are done! All you have to do now is to insert any CD/DVD inside your optical rive and you can access to its content from any computer inside your network. If you found this tutorial useful and would like to share your opinions about it leave them in comment section below.
Details: thetechjournal
To get started follow steps below
Step 1: First click the Start button and then choose Computer.
Step 2: Right mouse click on the drive which you want to share and from context menu choose Properties.
Step 3: Open the Sharing tab.
Step 4: In the window that opens, click Advanced Sharing.
Step 5: In window that showup check the box in front of Share this folder
Step 6: Name the player, Shared Drive for example and then click the Permissions button.
Step 7: Verify that the Everyone group has read access to the drive. Confirm changes by clicking OK twice.
Step 8: Now when we have our drive available for sharing lets simply the access to him by disabling the password request for example. For that while still in Sharing tab you opened in Step 3 click on the link Network and Sharing Center link.
Step 9: Now under Password protected sharing select Turn off password protected sharing.
Step 10: Click Save Changes and your optical drive is then shared.
Step 11: If you want to be sure that your drive is shared an icon in the explorer indicates that the drive is shared (see image below).
Step 12: Now lets access your drive from other computer or laptop on which you don’t have optical drive. For that click the Start button and click Computer.
Step 13: In the left pane, click Network.
Step 14: Double click the name of the computer on which you have shared the optical drive and he should appear in the results list.
Step 15: Right mouse click on yellow folder with your drive name you previous added and then from context menu click Map Network Drive.
Step 16: Choose the letter to assign to that drive and click Finish
Step 17: The optical drive which you just chosen to be shared will appear in the Windows Explorer of any computer in your network, under the section Network Location.
You are done! All you have to do now is to insert any CD/DVD inside your optical rive and you can access to its content from any computer inside your network. If you found this tutorial useful and would like to share your opinions about it leave them in comment section below.
Details: thetechjournal
SSD Vs. HDD – Which Is Better And Why?
You can never pin a decision, when it comes to technology, by relying on one or two factors. You will inevitably have to rely on a number of factors to see which of the two things, when compared, is better. I have attempted to prove, in light of multiple factors, whether SSD or HDD is better.
HDD is basically a mechanical drive with spinning disks, spindles and heads to read and write the data. SSD, on the other hand, contains none of these and is a solid state drive.
SSD Vs. HDD: Performance
Performance, in case of a hard disk, means that how fast your hard disk works. Does your computer takes ages to boot or does it boot in seconds? When you are accessing any data from your hard drive, are you able to do it fast or does it take a lot of time? These are the questions to consider in case of HDD as well as SSD.Since it is a mechanical drive, HDD may result in high-burst speeds. This means that it may reach the start of a data you are trying to access immediately, but then it is unable to sustain that speed. SSD, on the other hand, is a high-speed drive which is able to sustain this speed. Another important feature is now SSD supports SATA 3.0 which support 6.0 Gb/s transfer. You can gauge the difference from the fact that HDD can furnish a read speed of up to 150 MB whereas an SSD can provide 510 MB. When it comes to writing speeds, HDD can perform at 150 MB while SSD can work up to 480 MB!
SSD Vs. HDD: Durability
Durability is a very important factor when deciding between HDD and SSD. Is the drive you are using secure or can it be damaged easily? Because if it is damaged easily, you may lost all of your data with slight carelessness. Moreover, what is the life-span of your drive? Will it expire within a year or two or will it last longer?A drive comprising of mechanical heads and other components can easily be damaged, be that by a physical jolt or an electric shock. That’s what happens with HDD often. SSD, on the other hand, can stand all this and more without taking any damage. Moreover, the life span of HDD is expectedly three to five years while that of SSD is in decades.
SSD Vs. HDD: Power Consumption
In terms of power consumption, HDD is a dinosaur. On average, an HDD consumes six or more Watts power whereas an SSD uses three Watts or less! That’s a difference of 50%. In this way, you can calculate that although SSD may cost more, you will be able to save a lot in energy bills by using an SSD.Also, fluctuations in the power supply can permanently damage HDD, making you lose your important data stored on it. SSD, on the other hand, can stand power fluctuations and if power drops too low, a secondary voltage hold-up circuit takes care of this. Specially in Laptop using SSD you will get at least 30 minute more battery life, depending on other factors, too.
SSD Vs. HDD: Hot Unplug/Plug Feature
When you hitch up your HDD to a computer, the computer takes a lot of time to discover it and reboot with this drive can take a lot of time. With SSD, the moment you plug it into a computer, it is available within seconds! Naturally, with SSD, the boot speed of the machine is greatly enhanced. Also using SSD in USB port or in eSATA port is very easy and does not require system to reboot to recognize the SSD.SSD Vs. HDD: Pricing
SSD is slightly pricier as compared to HDD. Just consider this: you can lay your hands on a HDD with 1 Terabyte space for a mere $90. Getting a SSD for the same space will cost you a lot. Gauge it from this that you will pay $60 for a SSD with 60GB of space. The prices of SSD are dropping as their use becomes more widespread. So you can expect this price tag to go even lower in the coming days.SSD Vs. HDD: The Verdict
So, in view of all of this, the question is which is better and why. I’m sure most would agree by now that SSD is better than HDD in nearly all measures. We can’t look away from the countless advantages of using a SSD. And SSD is taking over HDD, check all recent Laptop, Desktop, Mac, All-in-One PCs are coming with at least one SSD.The best thing to do, then, for a common user, is to purchase a SSD with some space, one which is affordable and install the OS and other important software on it. For instance you can easily afford the above mentioned 60GB SSD. This SSD drive can then be used to boot the machine while you can keep your data on a huge terabyte HDD. This would ensure that the machine boots fast and the system is secure and that, at the same time, you have loads of data storage space on your machine. In this way, you will be able to reap the benefits of both.
Easy & Cheapest System Performance Improvement Using SSD
Moreover, by adding a small SSD to your machine and boasting the boot speed, you can easily improve the performance of your machine without having to go for a pricey upgrade, such as that of the processor or the RAM. Simply by including an SSD, you can enjoy better and faster speeds of your machine. If you wish to replace your laptop’s hard drive with SSD, here’s a detailed tutorial to help you step-by-step.
Sources: ServerWatch/ SSDreview/ PCWorld
Windows 8 On Retina Display MacBook Pro Is A Sight To Behold
Retina display MacBook Pro is currently probably one of the most powerful as well as the ultra desirable notebook on the market. Apple was able to pack an amazing Retina display and some extra-ordinary power in the machine. Ever since the machine was released, the world has been looking to newer ways to fully bring out the beauty of its Retina display.
Anand Tech had a new idea to explore MacBook Pro’s Retina display. Many critics have deemed Microsoft’s upcoming Windows 8 as probably the best when it comes to visual experience. Thus, folks at Anand tech decided to check out how did Windows 8 look like on MacBook Pro’s Retina display.
A slight problem that they ran into was that GeForce GT 650M doesn’t have any native driver support for Windows 7 or Windows 8. The amazing part is that even without the Nvidia driver, the display was able to provide a Windows 8 preview in all its clarity and glory.
Packing a massive 2880 x 1800, Retina display provides what is the most clear and vivid display yet. However, Apple doesn’t offer a lower than 1920 x 1200 desktop resolution in OS X. However, on Windows, you can adjust the resolution with a little more freedom. When you go with the unscaled 2880 x 1800 resolution, the text with the icons and the general User Interface elements tend to look very small. And only such users with an excellent eyesight may be able to enjoy them.
If Apple eventually choose to include a native resolution option with OS X, that is definitely going to solve a lot of such problems for Retina MacBook Pro users in the coming days.
Source: AnandTech
Courtesy: iClarified
| |
A slight problem that they ran into was that GeForce GT 650M doesn’t have any native driver support for Windows 7 or Windows 8. The amazing part is that even without the Nvidia driver, the display was able to provide a Windows 8 preview in all its clarity and glory.
Packing a massive 2880 x 1800, Retina display provides what is the most clear and vivid display yet. However, Apple doesn’t offer a lower than 1920 x 1200 desktop resolution in OS X. However, on Windows, you can adjust the resolution with a little more freedom. When you go with the unscaled 2880 x 1800 resolution, the text with the icons and the general User Interface elements tend to look very small. And only such users with an excellent eyesight may be able to enjoy them.
If Apple eventually choose to include a native resolution option with OS X, that is definitely going to solve a lot of such problems for Retina MacBook Pro users in the coming days.
Source: AnandTech
Courtesy: iClarified
How To Encrypt External Drives On Mac OS X Lion
Most of us use external hard drives for backups or to store important files and it’s very important to protect that data. One of easiest ways to do that is by encrypting your external hard drive and in this tutorial I will show you how to perform this quite easy but very effective procedure under Mac OS X Lion. 
Before you proceed to actual external hard disk encryption make sure you have create a backup all data from this hard disk because we will need to format it which will erase all data from the disk. Once your disk is empty proceed to below steps
Step 1: Make sure that you external hard drive is connected with your Mac computer
Step 2: From top toolbar in Mac choose Go and from dropdown menu choose Utilities

Step 3: From Utilities window double click on Disk Utility.app icon
Step 4: From left hand side of Disk Utility window select/highlight your external hard drive and then choose Erase tab
Step 5: From dropdown menu choose Mac OS Extended (Journaled, Encrypted) and under Name type a name for your drive

Step 6: Click Erase button to proceed
Step 7: To start the encryption process you will need to enter a secure password and click Erase button
Step 8: Disk Utility will start formatting and encrypting your external hard drive. You will see a progress bar in lower right corner of your window.

Step 9: Once it’s done simply copy any files you like to this drive and safely eject disk. To do that go to Disk Utility again, inside right frame right click on your external hard disk and from context menu choose Eject Disk.
There you go! Your external hard disk is now encrypted, but remember that next time when you plug-in this drive it will ask you to type a password you have entered in Step 7.
Details: thetechjournal
Before you proceed to actual external hard disk encryption make sure you have create a backup all data from this hard disk because we will need to format it which will erase all data from the disk. Once your disk is empty proceed to below steps
Step 1: Make sure that you external hard drive is connected with your Mac computer
Step 2: From top toolbar in Mac choose Go and from dropdown menu choose Utilities
Step 3: From Utilities window double click on Disk Utility.app icon
Step 4: From left hand side of Disk Utility window select/highlight your external hard drive and then choose Erase tab
Step 5: From dropdown menu choose Mac OS Extended (Journaled, Encrypted) and under Name type a name for your drive
Step 6: Click Erase button to proceed
Step 7: To start the encryption process you will need to enter a secure password and click Erase button
Step 8: Disk Utility will start formatting and encrypting your external hard drive. You will see a progress bar in lower right corner of your window.
Step 9: Once it’s done simply copy any files you like to this drive and safely eject disk. To do that go to Disk Utility again, inside right frame right click on your external hard disk and from context menu choose Eject Disk.
There you go! Your external hard disk is now encrypted, but remember that next time when you plug-in this drive it will ask you to type a password you have entered in Step 7.
Details: thetechjournal
How To Jailbreak Your iDevice On iOS 5.1.1 Using Absinthe 2.0 [Windows]
As most of the iOS users will be well aware, the much-anticipate and eagerly awaited Absinthe 2.0 tool is here, enabling iOS users to break free from the bounds placed on their devices by Apple. All you have to do is download Absinthe 2.0, install it and voila, you will be able to access a whole plethora of new apps and extensions on your iOS device. Given below is a simple tutorial to help you accomplish jailbreak using Absinthe 2.0, on Windows.

Before you begin with the jailbreak, be sure to restore and backup your data. While Absinthe 2.0 is quite secure and comes from some of the most intelligent minds in the iOS community, you never know what may go wrong and when. And so, rather than risking the loss of data, its better to have a backup pre-handedly.
You may check out the list of devices which are supported by Absinthe 2.0 to see if your particular iDevice is supported. Generally, Absinthe 2.0 supports nearly all A4 and A5 devices running iOS 5.1.1. Given below is a step by step tutorial to help you accomplish jailbreak using the tool on Windows.
Step 1: Download the latest version of Absinthe for Windows from here.
Step 2: Extract the downloaded archive.
Step 3: Go to the file that was just extracted and double click the file named absinthe-win-2.0.exe.
Step 4: When you click the file, it will create another folder named absinthe-win-2.0.

Step 5: Open this new folder and double click the file absinthe.exe
Step 6: This will launch the setup and you will be asked by the setup to plug in your iDevice to the computer through USB. You should make sure that there are no passcodes or VPN settings intact on your device before you plug it to the computer.
Step 7: Once you’ve plugged in the device, hit the jailbreak button on the window.

Step 8: This will initiate the process and the setup will automatically take you through a number of steps including initialization of jailbreak, sending initial jailbreak data, sending final data, waiting for reboot and completion of process.

Step 9: Once the jailbreak completes, you will be told on the window that you are done. You should see a Cydia icon within few minute on your Springboard which will confirm the completion of the jailbreak.
Details: thetechjournal
Before you begin with the jailbreak, be sure to restore and backup your data. While Absinthe 2.0 is quite secure and comes from some of the most intelligent minds in the iOS community, you never know what may go wrong and when. And so, rather than risking the loss of data, its better to have a backup pre-handedly.
You may check out the list of devices which are supported by Absinthe 2.0 to see if your particular iDevice is supported. Generally, Absinthe 2.0 supports nearly all A4 and A5 devices running iOS 5.1.1. Given below is a step by step tutorial to help you accomplish jailbreak using the tool on Windows.
Step 1: Download the latest version of Absinthe for Windows from here.
Step 2: Extract the downloaded archive.
Step 3: Go to the file that was just extracted and double click the file named absinthe-win-2.0.exe.
Step 4: When you click the file, it will create another folder named absinthe-win-2.0.
Step 5: Open this new folder and double click the file absinthe.exe
Step 6: This will launch the setup and you will be asked by the setup to plug in your iDevice to the computer through USB. You should make sure that there are no passcodes or VPN settings intact on your device before you plug it to the computer.
Step 7: Once you’ve plugged in the device, hit the jailbreak button on the window.
Step 8: This will initiate the process and the setup will automatically take you through a number of steps including initialization of jailbreak, sending initial jailbreak data, sending final data, waiting for reboot and completion of process.
Step 9: Once the jailbreak completes, you will be told on the window that you are done. You should see a Cydia icon within few minute on your Springboard which will confirm the completion of the jailbreak.
Details: thetechjournal
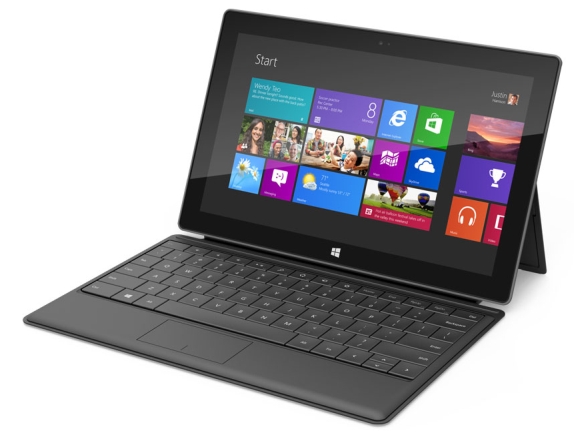
Microsoft Finally Announces A 10.6 Inch Surface Tablet, Powered By Windows 8
After a lot of anticipation, wait and eagerness, Microsoft is finally out with its trump card. The company has kept us all in suspense as to what are the big news it was to offer today. And now, the company has gone on to reveal the first Windows 8 tablets, revealing their specs in all their glory and beauty.
For long, it has been suspected that Microsoft was working on a tablet of its own, all with a hardware and software which it is going to pack and market itself, much like Apple. And now, Microsoft has confirmed this.
At a press event today, the company unveiled what it is calling the Surface tablets. Essentially, there are going to be two models of Surface tablets.
One of the two will be tooling an Intel 22nm Ivy Bridge processor and will run Windows 8 Pro. It will be 13.5 mm thick and will weigh a mere 1.9lbs. This version will also have digital ink support, coming with a pen which will magnetize to the body. The display of the tablet is going to be a 10.6-inch ClearType ‘Full HD.’
The second model is the one which is based on ARM. It will make use of an ARM chip and consequently, will tool Windows RT. Being thinner than the other model, it is barely 9.3mm thick and comes at a weight of 1.5lbs. Microsoft says that this is the first ever PC with a vapor-deposited magnesium case.
Both models will come with a built-in kickstand. The ARM model will be available in 32GB and 64GB versions whereas the Intel-powered tablet will be available in 64GB and 128GB versions.
For now, the company hasn’t revealed anything regarding the retail pricing of these tablets and intends to reveal this near the availability of the tablets. The ARM-based Surface tablet will be available once Windows 8 debuts whereas the Intel-powered model will ship some three months later.
Source: The Verge
Windows 8 Pro Tablet VS Windows RT Tablet – A Comparison
Microsoft has just unveiled two of its tablets side by side at its today's event. Tooling two different kinds of hardware, Microsoft seems to be hoping to make a solid entry into the tablet market. Given below is a brief comparison of the two tablets.
Design:
The ARM-based Surface tablet which runs Winodws RT is 0.36 inches thick and weighs a mere 1.5 pounds. It is available in black color.
The Intel-based Surface tablet running Windows 8, on the other hand, is slightly thicker at 0.49 inches and weights 1.99 pounds, about 0.5 pounds more than the other model. The display of both models is a 10.6-inches
Processing power:
The Intel based Surface tablet makes use of a 22nm Intel Ivy Bridge processor, the latest remarkable chip from Intel which has awed the world.
On the other hand, the ARM tablet makes use of Nvidia’s Tegra processor, which has also been hailed as among the best.
Storage space:
One of the downside, it may seem, of using the ARM based tablet is that it wouldn’t be coming with larger storage options. Currently, Microsoft has announced two versions of the tablet, one with 32 GB and another with 64GB. However, an excellent feature that has been added by Microsoft is that the storage can be extended through microSD.
Intel-based Surface tablet, however, seems to have larger storage options. It will be coming with both in 64GB and 128GB versions and will also have the microSD option.
Ports and battery:
ARM Surface tablet has both Video out and USB 3.0 connections. Intel-based Surface tablet also features Video out as well as USB 3.0 and Mini DisplayPort connections together with a 3.5mm headphone connection.
The battery of Windows RT Tablet has a capacity of 31.5Wh whereas that of Windows 8 Pro is 42Wh.
Source: The Verge
Details: thetechjournal
HP Envy 17 3D Review and Ratings
Desktop-replacement laptops usually come in one of three sizes: big, bigger, or biggest. Beyond that, power and performance, and more recently 3D capability, have been their differentiating factors. Rarely have we seen a laptop with a 17-inch screen that weighs as little as 7.5 pounds—that is, until the original HP Envy 17 visited our labs. It’s sleek, like an Apple MacBook Pro; powerful, like an Alienware gaming laptop; and relatively affordable, like the Asus Republic of Gamers G73Jh. We liked it—a lot. How could HP make it better?
Well, we're not quite sure yet. We retested the Envy 17 in its recently released 3D-ready configuration, which starts at $1,599. (That's a $300 premium over the non-3D version's entry model.) This revised version of the Envy 17 doesn’t break any price barriers at either the high end or the low end. But considering what you're getting, the Envy 17 3D doesn't offer much more than its almost identical 2D counterpart, which was our new favorite choice for power users who refuse to make sacrifices in the name of price or portability.
The uncluttered keyboard deck is also aluminum, following the dark bronze motif. As with the lid, it has a dotted texture that comes from an etching method that we’ve seen only on Envy notebooks. The top-most portion of the deck, between the screen hinge and the keyboard, gets exceedingly hot, however, even during mild usage. Using an infrared thermometer, we measured 122.6 degrees on the left side of the keyboard while the system ran our Company of Heroes gaming trial.
The backlit Chiclet keyboard and dedicated number pad are very comfortable and satisfying to type on. The well-spaced, flat-top keys should please anyone with slender-to-medium-size fingers. (The keys might be a little small for those with larger fingers, however.) The keys are hard plastic with good vertical travel and a nice tactile response. Also, we like that the media-playback and display functions have been swapped with the conventional "Function" functions. (Not at all confusing, we know!) Translating: What this means is that instead of having to hit, for example, the key combination Fn+F7 to reduce the volume, now you only have to hit the F7 key to reduce the volume. If you ever need to trigger the F7 key in the traditional way as a system function, you then would use a key combination.
The huge touch pad (it measures almost 5 inches diagonally) offered unmatched precision with the cursor. The pad has its mouse buttons integrated into it, so the touch pad is actually one big button with lines painted on it to indicate its button areas. We liked the large surface area and its smooth feel, which did not produce any drag.
The touch pad also lets you perform certain multifinger commands, such as using two fingers to scroll. This worked okay, but not great. The pad doesn’t offer "inertia scrolling," of the kind that Apple provides on its MacBooks and other products. (With inertia scrolling, the screen speeds by the faster you flick your fingers.) Also, we sometimes had trouble getting our two fingers to register on a Web page, so the page would not scroll when it should have. You can rotate images using two fingers, and this worked well on our tests, as did the pinch-zoom functionality. The Synaptics touch-pad applet that HP bundled with the system indicated that we could enable three-finger gestures, which we tried, but those didn't work. Overall, we'd classify the multitouch experience as finicky.
The full-HD display was gorgeous for playing back Blu-ray movies, and the viewing angles were, simply, the best we’ve ever seen in a laptop. In fact, we could see the whole image no matter how far off-center the viewing angle. If you can see the front of the screen, you can see what’s playing on it, with no loss of color. Glare was very noticeable on this glossy display, but that’s to be expected from a media-centric machine.
The big differentiator with the Envy 17 3D, of course, is its namesake 3D functionality. Unfortunately, on our tests, this feature did not measure up to the price premium that it exacts. For its 3D solution, HP opted for AMD's HD3D technology, working in concert with an application called TriDef. (The other major 3D-on-PC technology we often see is Nvidia's GeForce 3D Vision. Click to see our look at a GeForce 3D Vision kit.) Using TriDef, you can view popular types of 2D content, such as PC-game titles, Google Earth, movies, and photos, in 3D. The 3D setup uses a set of wireless active-shutter glasses paired with AMD's 3D-capable 1GB ATI Mobility Radeon HD 5850 graphics chipset. (One pair of glasses comes bundled with the Envy 17 3D.)
We liked having the option of giving our humdrum 2D media some depth, a feature lacking on 3D-capable laptops that use Nvidia's GeForce 3D Vision, such as the Acer Aspire 5745DG. (Nvidia GeForce 3D Vision-based 3D requires third-party software to convert 2D to 3D.) We also like that the active-shutter glasses that HP provides cost only $99 for extra pairs, compared with Nvidia’s $149 ones. However, we were sorely disappointed to find that the battery in the glasses had died after sitting idle for a week or so, and there is no way to recharge it. Unlike Nvidia's glasses, these don't have an on/off switch, so even though they're rated for 180 hours of use, you're not likely to see that kind of runtime with them unless you remove the battery, since they don't shut off on their own. Furthermore, the battery is a coin-cell lithium-ion battery, which is much harder to find than a standard AA or AAA and costlier to replace. We would have much preferred a built-in, rechargeable battery, much like we see on other active-shutter glasses, or at the very least, an on/off switch to preserve battery life. For what it's worth, we did check with HP on this issue, and a representative said, "If 3D content is being played, the IR transmitter in the bezel of the screen should communicate and activate the active-shutter glasses." Unfortunately, the glasses were unable to detect when 3D content was not being played, and HP had no further comment on this issue other than to say the company would look into it.
Even more of an issue than the battery bumble is the 3D imaging itself. Whether watching the included 3D Blu-ray disc of Alice in Wonderland or playing Sid Meier's Civilization V, we constantly saw uncorrectable cross-talk in the 3D imaging. (That's the misalignment of the two interlaced images; just cross your eyes, and you'll get the idea.) We also noted that in 3D, the viewing angle of the screen became very narrow. You must watch 3D media directly in front of the display to keep the image from flickering heavily. This consistently left us with a headache and the desire to use the gorgeous HD screen in 2D only, sans the 3D effect and uncomfortable glasses. While that may not happen to you, at least two of our staffers experienced headaches while watching 2D converted to 3D on this system.
As noted, you can also see movies and games that were not originally designed for 3D in a rendered pseudo-3D using TriDef. Using the TriDef software to do this was easy. Standard-definition DVDs are presented in 3D by default, but there’s a toggle button that appears on the screen, so you can easily turn 3D off and just watch in 2D. Games require minimal setup (selecting the .EXE file and selecting the game off of a list). Unfortunately, the minimal setup was matched by minimal gee-whiz. In general, we did see depth, where the image appears to extend backward, but images did not extend, or pop out, toward us, lacking the traditional 3D effect you get when watching a 3D movie in a theater. To be fair, laptop 3D capabilities in general aren't built to have that real pop-out effect, however.
To test the 3D and TriDef software, we played a regular (2D) version of Far Cry 2. After playing for about 20 minutes, we felt dizzy and disoriented. Although this suggests a substantial level of immersion, the prolonged discomfort and difficulty with depth perception even after we stopped playing left us wary.
We then popped in an ordinary DVD of The Matrix. We didn't feel dizzy after watching, but we did feel a headache from the noticeable crosstalk. One viewer felt a headache within seconds of starting playback. Another watched for a minute or two before the eye-strain kicked in. Otherwise, we were underwhelmed by the 3D rendering. While close-up images of people generally looked good (backgrounds looked clearly at a distance behind them), long, intricate shots that should have emphasized the 3D properties looked flat. For example, a shot straight down a spiral staircase (and another aerial shot looking down in the rain), which seemed well-suited for an exciting 3D effect, looked disappointingly 2D, as though the TriDef software figured there was no more work to be done on that scene.
Overall, the 3D was effective only enough to mess with our vision and leave us with a nasty headache. The added depth was noticeable, but it wasn't pleasurable or wow-inducing. We had, at any given time during testing, two or three people looking at this system, wearing the glasses in turn, and gathering opinions about the 3D. While all of our experiences varied somewhat, none of us came away with a positive impression of it.
There's also the question of natively 3D content. You have the option of purchasing made-for-3D movies online from Yabazam.com, but the selection was extremely lacking. The 36 available titles, none of which you have likely ever heard (or would want to watch), were exorbitantly expensive. Rio de Janeiro's Carnival 2009 and Red Crab: Australia's Christmas Island, which cost $14.99 each, seemed to be the most professional and interesting (not to mention expensive) choices.
Despite how media looked on the 3D display, it sounded great. Listening to music and movies was very a good experience on the Envy 17, thanks to the Beats Audio system. (Beats is high-end audio software that claims to reproduce the "original sonic integrity" and is presented in conjunction with the recording artist Dr. Dre, exclusively for HP notebooks.) The volume was very strong, and the speakers were far more powerful than what you typically get from a notebook. Our only audio quibble: While we heard more bass than we usually do from laptop speakers, this system was still a little lacking in that department.
The port selection on the Envy 17 is generous. Along the left side, you’ll find a VGA port, a mini-DisplayPort, and an HDMI port—all options for outputting to an external monitor. You can use all three at once, too, thanks to ATI’s Eyefinity multi-display technology, which lets you connect to as many as three external displays side by side. (It's a feature of the onboard ATI Radeon graphics chipset.) Also on the left edge is an eSATA/USB combo port for connecting an external hard drive, plus one USB 3.0 port, a headphone/mic combo jack (for use with a headset when making VoIP calls), and one more standard headphone jack. That's plenty of connectivity by itself, but on the right, you’ll find two USB 2.0 ports, a five-format memory-card slot, a power jack, and a Kensington cable-lock slot. We were also happy to see a slot-loading Blu-ray drive, which is rare among notebooks. (Nearly all Blu-ray drives we've seen in laptops up until now have used clunkier tray-loading mechanisms.)
Another pleasant extra is the HP TrueVision HD Webcam, which produced excellent imaging for video chats. On our end, skin tones from the embedded camera looked a bit red, but the person on the other end said the picture was crystal-clear (we were connected via Ethernet), and she didn’t think we looked red at all. The Webcam captures photos at a maximum of 1,280x1,024 resolution. The images looked pretty good, even when blown up to the full screen size. We did notice some noise and motion blur in the video capture, but not enough to really complain about. It handled low light surprising well; we could see the subject’s face just fine using only the light from the screen.
Wireless-connectivity options are a bit limited on this laptop, with just Bluetooth and 802.11n radios included, but given the size of this notebook, support for mobile broadband or WiMAX probably would have been overkill. We don’t expect to see a lot of 17-inch notebooks making daily commutes.
Now, on to the fun part: performance. The Envy 17 3D—bolstered by its quad-core 1.6GHz Intel Core i7-Q720 CPU and 6GB of DDR3 memory—performed very well on our tests. On our PCMark Vantage test, which is a measure of overall system performance, the Envy 17 hovered around the average scores we've seen from desktop-replacement laptops, with scores of 5,865 on the 32-bit version of the test and 6,023 on the 64-bit version. Both were a marginal departure from the regular Envy 17, which has the same internal components and scored 5,849 and 6,324 on these tests. Perhaps more important, however, is that it held up well against one of its closest competitors, the $1,599 Acer Aspire 8943G-9429, which scored 5,358 on the 32-bit test and 6,076 on the 64-bit test.
To test the CPU specifically, we run several media-file-crunching tests, which comprise encoding a standard video clip in Windows Media Encoder (WME) and converting 11 standard MP3 files to AAC format in our iTunes Conversion Test. The system did well on both tests. It took 3 minutes and 53 seconds to complete the task in WME (43 seconds longer than the original Envy 17); the Acer Aspire 8943g finished in 4 minutes. On the iTunes Conversion Test, the Envy 17 3D completed the trial in 3:32, which is strong. Here, the Acer Aspire was slower, at 3:50.
One last CPU test we run is Cinebench 10, which taxes all of the cores (in this case, four) of the processor. Again, the Envy 17 3D beat out the competition, with scores of 5,205 on the 32-bit version of the test and 10,153 on the 64-bit version, which is just barely better than the regular Envy 17 on the 64-bit version (10,250) and a sizable score reduction on the 32-bit test (8,425). It held its own against the Acer system, which scored 8,326 on the 32-bit version of the test and 10,206 on the 64-bit version. Overall, these are very good scores. They indicate that you’ll be able to process large images, multitask, and do loads of productivity tasks without spending too long watching that little blue circle do somersaults.
Moving from the CPU to the GPU, we also run a series of graphics tests. The Envy 17's powerful ATI Mobility Radeon 5850 chipset, with its own gigabyte of dedicated memory, happily blasted through our 3DMark06 test, which measures DirectX 9 graphics performance. Here, the Envy 17 3D easily spanked the Acer, delivering scores of 11,974 at 1,024x768 resolution and 9,355 at its native resolution of 1,920x1,080. The Acer was far behind, with scores of 9,896 at 1,024x768 and 7,168 at its native resolution (1080p). Also, these are nearly identical to the 2D Envy 17’s scores.
To get a better idea of how the Envy 17 would perform in a real-world gaming scenario, we put it through its paces with one of our standard test games, Company of Heroes. All the frame rates we saw were very playable. On our DirectX 9 run of the Company of Heroes test, it cranked out 85.7 frames per second (fps) at its native resolution. For DirectX 10, that score edged up to 93fps, which is still excellent. The Acer Aspire came nowhere close to these scores, and the numbers from the Envy 17 3D even beat out a $4,000 configuration of the MALIBAL Satori we tested, which managed only 91.3fps and 31fps at those settings.
Typical of a big, powerful notebook, the Envy 17 doesn't offer a whole lot in the way of battery life, On our DVD battery-rundown test, it conked out unceremoniously while playing our test DVD (The Matrix) just 58 minutes into the movie. That means you’ll want to travel with the power brick, which, unfortunately, is almost 6 inches long and about 3 inches wide. Note, also, that it gets very warm when the notebook is in heavy use.
The HP Envy 17 3D isn’t the fastest or most powerful notebook to grace a LAN party or an artist’s studio; it’s not a workstation or a gaming rig. It’s an entertainment notebook that does an excellent job of entertaining. Music playback was very good, Blu-ray movies looked terrific, and high-end gaming is more than possible on this notebook. Plus, you get so many extras—the slot-loading Blu-ray, triple-display functionality, the HD Webcam, solid software, and more—for a very reasonable $1,599. But all of this, except for the 3D, can be found on the regular Envy 17 for $300 less. Add to that the uncomfortably high temperature the unit can reach after relatively little use, and we suggest either holding out for a more polished 3D desktop-replacement machine or choosing the ordinary Envy 17.
Credits: computer shopper
Well, we're not quite sure yet. We retested the Envy 17 in its recently released 3D-ready configuration, which starts at $1,599. (That's a $300 premium over the non-3D version's entry model.) This revised version of the Envy 17 doesn’t break any price barriers at either the high end or the low end. But considering what you're getting, the Envy 17 3D doesn't offer much more than its almost identical 2D counterpart, which was our new favorite choice for power users who refuse to make sacrifices in the name of price or portability.
Design
The Envy 17 3D is slim enough that you might not think, at first, it qualifies as a true desktop-replacement machine. At just 1.25 inches thick and 7.5 pounds, this is an impressively sleek laptop. The laser-etched lid and the chassis, both in bronze-colored aluminum, scream durability, resist showing fingerprints, and hint at high-end components lurking underneath.The uncluttered keyboard deck is also aluminum, following the dark bronze motif. As with the lid, it has a dotted texture that comes from an etching method that we’ve seen only on Envy notebooks. The top-most portion of the deck, between the screen hinge and the keyboard, gets exceedingly hot, however, even during mild usage. Using an infrared thermometer, we measured 122.6 degrees on the left side of the keyboard while the system ran our Company of Heroes gaming trial.
Here you can see the display, the deck, and the bundled active-filter 3D glasses.
The function-key row. The media functions are primary here, and the typical "Function" functions are secondary, which gives you almost-dedicated media buttons without requiring extra buttons on the keyboard deck.
The touch pad also lets you perform certain multifinger commands, such as using two fingers to scroll. This worked okay, but not great. The pad doesn’t offer "inertia scrolling," of the kind that Apple provides on its MacBooks and other products. (With inertia scrolling, the screen speeds by the faster you flick your fingers.) Also, we sometimes had trouble getting our two fingers to register on a Web page, so the page would not scroll when it should have. You can rotate images using two fingers, and this worked well on our tests, as did the pinch-zoom functionality. The Synaptics touch-pad applet that HP bundled with the system indicated that we could enable three-finger gestures, which we tried, but those didn't work. Overall, we'd classify the multitouch experience as finicky.
The full-HD display was gorgeous for playing back Blu-ray movies, and the viewing angles were, simply, the best we’ve ever seen in a laptop. In fact, we could see the whole image no matter how far off-center the viewing angle. If you can see the front of the screen, you can see what’s playing on it, with no loss of color. Glare was very noticeable on this glossy display, but that’s to be expected from a media-centric machine.
Features
The TriDef software makes it easy to see exactly what you can do in 3D.
We liked having the option of giving our humdrum 2D media some depth, a feature lacking on 3D-capable laptops that use Nvidia's GeForce 3D Vision, such as the Acer Aspire 5745DG. (Nvidia GeForce 3D Vision-based 3D requires third-party software to convert 2D to 3D.) We also like that the active-shutter glasses that HP provides cost only $99 for extra pairs, compared with Nvidia’s $149 ones. However, we were sorely disappointed to find that the battery in the glasses had died after sitting idle for a week or so, and there is no way to recharge it. Unlike Nvidia's glasses, these don't have an on/off switch, so even though they're rated for 180 hours of use, you're not likely to see that kind of runtime with them unless you remove the battery, since they don't shut off on their own. Furthermore, the battery is a coin-cell lithium-ion battery, which is much harder to find than a standard AA or AAA and costlier to replace. We would have much preferred a built-in, rechargeable battery, much like we see on other active-shutter glasses, or at the very least, an on/off switch to preserve battery life. For what it's worth, we did check with HP on this issue, and a representative said, "If 3D content is being played, the IR transmitter in the bezel of the screen should communicate and activate the active-shutter glasses." Unfortunately, the glasses were unable to detect when 3D content was not being played, and HP had no further comment on this issue other than to say the company would look into it.
Even more of an issue than the battery bumble is the 3D imaging itself. Whether watching the included 3D Blu-ray disc of Alice in Wonderland or playing Sid Meier's Civilization V, we constantly saw uncorrectable cross-talk in the 3D imaging. (That's the misalignment of the two interlaced images; just cross your eyes, and you'll get the idea.) We also noted that in 3D, the viewing angle of the screen became very narrow. You must watch 3D media directly in front of the display to keep the image from flickering heavily. This consistently left us with a headache and the desire to use the gorgeous HD screen in 2D only, sans the 3D effect and uncomfortable glasses. While that may not happen to you, at least two of our staffers experienced headaches while watching 2D converted to 3D on this system.
If you click on the round 3D button, you can toggle 3D on and off while watching a movie.
To test the 3D and TriDef software, we played a regular (2D) version of Far Cry 2. After playing for about 20 minutes, we felt dizzy and disoriented. Although this suggests a substantial level of immersion, the prolonged discomfort and difficulty with depth perception even after we stopped playing left us wary.
We then popped in an ordinary DVD of The Matrix. We didn't feel dizzy after watching, but we did feel a headache from the noticeable crosstalk. One viewer felt a headache within seconds of starting playback. Another watched for a minute or two before the eye-strain kicked in. Otherwise, we were underwhelmed by the 3D rendering. While close-up images of people generally looked good (backgrounds looked clearly at a distance behind them), long, intricate shots that should have emphasized the 3D properties looked flat. For example, a shot straight down a spiral staircase (and another aerial shot looking down in the rain), which seemed well-suited for an exciting 3D effect, looked disappointingly 2D, as though the TriDef software figured there was no more work to be done on that scene.
Overall, the 3D was effective only enough to mess with our vision and leave us with a nasty headache. The added depth was noticeable, but it wasn't pleasurable or wow-inducing. We had, at any given time during testing, two or three people looking at this system, wearing the glasses in turn, and gathering opinions about the 3D. While all of our experiences varied somewhat, none of us came away with a positive impression of it.
There's also the question of natively 3D content. You have the option of purchasing made-for-3D movies online from Yabazam.com, but the selection was extremely lacking. The 36 available titles, none of which you have likely ever heard (or would want to watch), were exorbitantly expensive. Rio de Janeiro's Carnival 2009 and Red Crab: Australia's Christmas Island, which cost $14.99 each, seemed to be the most professional and interesting (not to mention expensive) choices.
Despite how media looked on the 3D display, it sounded great. Listening to music and movies was very a good experience on the Envy 17, thanks to the Beats Audio system. (Beats is high-end audio software that claims to reproduce the "original sonic integrity" and is presented in conjunction with the recording artist Dr. Dre, exclusively for HP notebooks.) The volume was very strong, and the speakers were far more powerful than what you typically get from a notebook. Our only audio quibble: While we heard more bass than we usually do from laptop speakers, this system was still a little lacking in that department.
HP includes Beats audio technology, which produced good (but not great) sound quality.
On the left, you'll find a VGA port, an Ethernet jack, a mini-DisplayPort, an HDMI port, an eSATA/USB combo, one USB 3.0 port, a headset/mic jack, and a stand-alone headphone jack.
The right side looks sleek, with two USB 2.0 ports, a five-format memory card slot, a slot-loading Blu-ray drive, the power jack, and a Kensington lock slot.
Performance
To test the CPU specifically, we run several media-file-crunching tests, which comprise encoding a standard video clip in Windows Media Encoder (WME) and converting 11 standard MP3 files to AAC format in our iTunes Conversion Test. The system did well on both tests. It took 3 minutes and 53 seconds to complete the task in WME (43 seconds longer than the original Envy 17); the Acer Aspire 8943g finished in 4 minutes. On the iTunes Conversion Test, the Envy 17 3D completed the trial in 3:32, which is strong. Here, the Acer Aspire was slower, at 3:50.
One last CPU test we run is Cinebench 10, which taxes all of the cores (in this case, four) of the processor. Again, the Envy 17 3D beat out the competition, with scores of 5,205 on the 32-bit version of the test and 10,153 on the 64-bit version, which is just barely better than the regular Envy 17 on the 64-bit version (10,250) and a sizable score reduction on the 32-bit test (8,425). It held its own against the Acer system, which scored 8,326 on the 32-bit version of the test and 10,206 on the 64-bit version. Overall, these are very good scores. They indicate that you’ll be able to process large images, multitask, and do loads of productivity tasks without spending too long watching that little blue circle do somersaults.
Moving from the CPU to the GPU, we also run a series of graphics tests. The Envy 17's powerful ATI Mobility Radeon 5850 chipset, with its own gigabyte of dedicated memory, happily blasted through our 3DMark06 test, which measures DirectX 9 graphics performance. Here, the Envy 17 3D easily spanked the Acer, delivering scores of 11,974 at 1,024x768 resolution and 9,355 at its native resolution of 1,920x1,080. The Acer was far behind, with scores of 9,896 at 1,024x768 and 7,168 at its native resolution (1080p). Also, these are nearly identical to the 2D Envy 17’s scores.
The design is classic Envy, with the laser-etched dot pattern and glowing HP logo.
Typical of a big, powerful notebook, the Envy 17 doesn't offer a whole lot in the way of battery life, On our DVD battery-rundown test, it conked out unceremoniously while playing our test DVD (The Matrix) just 58 minutes into the movie. That means you’ll want to travel with the power brick, which, unfortunately, is almost 6 inches long and about 3 inches wide. Note, also, that it gets very warm when the notebook is in heavy use.
Conclusion
HP loads the system with plenty of useful software goodies and not much bloatware. The Synaptics applet mentioned earlier, for example, lets you tweak different presets for the touch pad. There’s also HP’s Beats Audio control panel, and full versions of Corel PaintShop Pro X3 and VideoStudio Pro X3 for photo and video editing. You also get Roxio’s CinemaNow 2.0 (for DVD playback) and CyberLink's DVD Suite, which lets you play, burn, and create DVDs. Oddly, our system didn’t come with the near-ubiquitous trial version of Microsoft Office, though you can get a copy of Microsoft Office 2010 Starter Edition included at no extra cost. As for the warranty, HP backs the Envy 17 with an impressive two-year limited plan on the hardware—twice as long as the industry standard.The HP Envy 17 3D isn’t the fastest or most powerful notebook to grace a LAN party or an artist’s studio; it’s not a workstation or a gaming rig. It’s an entertainment notebook that does an excellent job of entertaining. Music playback was very good, Blu-ray movies looked terrific, and high-end gaming is more than possible on this notebook. Plus, you get so many extras—the slot-loading Blu-ray, triple-display functionality, the HD Webcam, solid software, and more—for a very reasonable $1,599. But all of this, except for the 3D, can be found on the regular Envy 17 for $300 less. Add to that the uncomfortably high temperature the unit can reach after relatively little use, and we suggest either holding out for a more polished 3D desktop-replacement machine or choosing the ordinary Envy 17.
Credits: computer shopper